Xebra is a PlayStation emulator. It focuses strictly on accuracy; it does not use any plugins and only outputs in native resolution.
It is one of the very few PS emulators that is compatible with PocketStation.
Download
Scroll down to the bottom of the official website, where you will see two screenshots. Click on the top shot for the PC build, or click on the bottom shot r an Android version.
Warning: As of 2015-12-03, Windows Defender claims that the PC build contains a trojan. VirusTotal shows two other scanners return warnings as well.
as of the 2017-01-17(xebra170117.zip) release only VBA gives a warning
Overview
XEBRA is based on research from reverse-engineering the PlayStation, resulting in the most accurate PlayStation emulator possible. The research and the emulator were both by Japanese programmer Dr.Hell. A sticking point with XEBRA is that the GUI attempts to emulate everything you can do with a PlayStation, so it's somewhat user-unfriendly.
Problems and solutions
As of Oct 11th 2015 build, XEBRA uses WaveOut as sound output. The audio will remain in perfect sync with the emulation and all crackling, buffering settings issues, stutter loops (when menu is selected) are no longer present.
Using XEBRA
XEBRA itself is made of a few different parts:
- XEBRA.EXE: The actual emulator.
- MCM.EXE: A memory card manager that allows you to edit memory card image files directly.
- MCIM.EXE: Another memory card manager, closely modeled after the one in the PlayStation BIOS.
- SIM.EXE: Highly advanced simulation options. You can save a configuration, then load it in XEBRA. This can be used to get certain games working, although development of the emulator has come to the point where this is usually not necessary.
- CUE2CCD.EX: Turns .bin/.cue dumps into CloneCD dumps. In general, CloneCD allows for more accuracy. Of course, this depends on whether the dump itself is accurate.
- Older versions of XEBRA had ARBEX.EXE, an alternate version of XEBRA.EXE that did not need a BIOS to run games, but couldn't run as much as XEBRA.EXE + a BIOS could. As of the 20th June 2015 version of XEBRA, XEBRA.EXE itself has a simplistic BIOS that runs the vast majority of games, and ARBEX.EXE has been removed.
Most options, such open/close shell, power, reset, start/stop card, loading memory card image and so on, work pretty much as they would if you did these things on a real console. Most of the other options are for debugging or advanced tuning of the emulator.
Setting the BIOS
Recent versions of XEBRA comes with a BIOS replacement. If you are having problems with a game you can still add a BIOS by going to File -> Open -> OSROM image, then finding a BIOS file. That will copy the file to the XEBRA directory and rename it OSROM (no file extension). Manually copying the file and renaming it works as well.
Loading Games
File->Open-> "CD-ROM via SPTI..." for a real CD in your CDROM drive or Daemon Tools emulated drive and select any file on the root of the CD.
File->Open-> "CD-ROM Image..." for an Image file (ISO,CUE, etc...) that has the same effect as the former, but you may have problems with CD-Audio and multi track CDs or they simply will not load at all.
To play you need to use "Run->Power(Run)" or F5. XEBRA supports several disc image formats. When in doubt about which file to load (CUE/BIN/MDF/CCD/IMG/etc) choose the largest one and XEBRA will automatically look for the files it needs as long it has they share the file name (game.ccd and game.img for example).
Note: Use latest Demon Tools Lite to load images instead of opening images directly in Xebra for best and most accurate emulation. XEBRA was created to be used with a CD drive and nothing does CD drive emulation better than Daemon Tools (actually not true, there is a cloning/mounting software available called Alcohol 120%, that does image mounting and CD drive emulation quite better than Daemon Tools. Alcohol 120%'s GUI is also very easy to understand and to use even for a complete newbie, unlike with Daemon Tools). The internal Xebra image loader sometimes has problems with CD-Audio and multi track CDs 9or will not load at all).
Changing discs
In games that need to change discs, you essentially do the same that you would do on a real PSX.
- Open the PSX CD drive with Run->Open Shell.
- Change the current disc on the drive with File->Open->CD-ROM via SPTI... or CD-ROM Image and select a file on the root of the CD.
- Close the CD drive with Run->Close Shell.
Setting up controls
This is the most complicated part of using Xebra. First choose "View->Controllers..." That will open a pop-up window with the current settings.
here is the layout of the menu
The top drop-down menu allows you to choose between changing the configurations of controller 1 or 2. The drop down menu below that will let you choose the kind of controller that is connected in that controller port:
- No Controller: as it says, it acts like nothing is connected to that port
- Mouse: PSX mouse
- Digital Controller: The launch PSX controller without analogs sticks (original PS1 Controller)
- Analog Controller: An upgraded PSX controller with dual analog sticks, (original PS1 Dual Analog Controller)
- Virtual Dualshock: The Dual Analog successor, Dualshock controller (original PS1 Dualshock Controller).
As with the original Dualshock, if a game does not respond to the Dualshock just click the "analog" button between the analog stick to turn the Dualshock to a Digital controller.
The buttons shown in the window are the buttons on the controller, they are laid out almost in the same way as the buttons on the real, physical, PSX controller. Having the window open without a controller port selected will show which each button is, press any of those followed by the button you want to use for it to set it up (note that there is also a set up for the ANALOG button found at the centre of a physical PSX analog controller, the button that toggles analog control on and off) the 4 drop down menus and the fields below it are for the analog sticks first is the X and Y axis for the left analog then the X and Y axis for the right analog, the numbers below it is the dead zone (the zone in which input on that analog stick will be ignored, useful for over-sensitive or poorly centred sticks that report input when not moving or are too sensitive) and the max range for the said axis.
It share the button configs across different controllers types, so you can change between analog and digital controllers without having to set up the buttons again. (NOTE: many PSX games do not recognize the Dual Shock and will not work unless set up with digital controllers,).
Audio and Video settings
As XEBRA aims to be an accurate emulator and does everything in-software, so there is not much that needs to be changed by the user.
View->Video Output...
Will take you to video settings which are:
- Use OpenGL: uses openGL to stretch and present the video output. Unless this is set up it will scale with software which is very slow, so just keep it on unless you have issues.
- Draw with Opengl(experimental): render the game with openGL in Hi Resolution like other emulator, it doesn't work very well for now. If you wish authentic PSX experience keep it off.
- Stretch with GDI: Lets Microsoft's "Windows Graphic Device Interface" stretch the image to the window size. Now works with OpenGL and should be kept On.
- Whole Frame Buffer: it will output the whole frame buffer, which usually is just a garbled mess, for debugging purposes. Keep Off.
- Nearest: only if Stretch with OpenGL is chosen, it will stretch the output image using the "nearest pixel" filter. This will keep all the pixels in their pixelated glory. Otherwise, it will use "Bilinear filtering", which blurs the whole thing. Bilinear can be used to somewhat simulate the "smoothed" appearance of a real CRT television.
- Progressive: the original PSX video output, like most analog TVs of the time, was interlaced. This will double the lines to output a progressive image. If you leave this off you may get line artifacts with fast motion in games (similar to the PSP 3000's screen problems). No real reason to keep it off.
- Drawing skip: this is a frame skip setting. 0 means no frame skip and any other number means skipping N frames for every frame draw. Something to try if your computer can't handle Xebra.
- Display Skip: a different kind of frame skip, it will run internally just as normal but will only show a frame every N frames. 0 means no skip. Note: for some strange reason. Xebra comes with a value "2" set by default, which does cause massive stuttering in 2d games. You might want to change that to 0.
View->Audio Output... and View->CD-ROM Drive...
Those are mostly emulation fine tuning settings, which are really complicated, don't touch it unless you know what you are doing.
View->Debug
Is a debug utility which is very complicated. Most likely you will never need to use this.
View->Width
This allows you to change the width of the window.
View->Height
The same but for Height. However the options in the format "number:number" are special as they set the Height based on the current Width to reach that aspect ratio. Use 16:12 for a normal SD aspect ratio (4:3) and 16:09 or 16:10 for widescreen aspect ratio
View->Rotate
Rotates the output in a 90 degree angle. A number of arcade games use the "3:4" ratio (a rotated 4:3 monitor), particularly vertical shmups. Ports of these games would normally cut out some of the game screen to fit on a regular unrotated 4:3 television. PlayStation ports typically have an option to display the correct game screen, and you can then physically rotate the TV to match.
View->Scale
Essentially, it's for the screen streching and black bars so it will fit on 16:9 and 16:10 resolution without distorting the image. 16:12 (4:3) is the default option and the ones that does nothing, pretty much what you want to use for windowed modes (changing the window size to a 4:3 resolution is easier and better than messing with this). It's is a matter of trying till find one you like. However, some of the options don't seem to work at all.
View->Full Screen
Puts XEBRA on full screen mode at the resolution of that screen. Note that pressing F12 in windowed mode will also take it to full screen and ESC will being it back to windowed. Pressing F12 on full screen mode will also show the menus.
Dealing with memory cards
As default, Xebra will start with two memory cards plugged into it. These are stored as the files "BU00" and "BU01" in the xebra directory. These memory cards work just as you would expect a real memory card to work, you can even manage them in the memory card screen of the PSX itself. (Open shell and reset the console).
To load a diferent memory card go to File->Open->Memory card 1/2 Image... You can also save a copy of the current memory card with File->Save->Memory card 1/2 Image... This has the same effect as changing memory cards in a real PSX, so don't do it whilst saving.
To remove all memory cards and act like there is none plugged to the console choose "Run->Stop card" and "Run->Start card" to plug them back.
the program MCM.exe however allows you to manage memory cards image files directly and in a more practical way:
- The option View->Remove SJIS will try to show the file names in non-Japanese characters, which is a lot more useful for us non-Japanese readers.
- It will show some things differently from the psx manager including only the first of a multiblock save having a file name while the others will be just named "LINK". Only the first file can be edited, however.
- Double click on a file and a pop up with appear, press "Yes" to delete and "No" to save that file as a single file.
- The open files menu only looks for files with the extension .mc... Even though the default memory cards image files have no extension. Just set it to open "all file types" for those.
- It can save the images in different formats and even just save the icons as bmps. However, use the save->general to save in a Xebra format.
- You can always edit a memory card image while the emulator is running in case you run out of space.
Emulating PocketStation
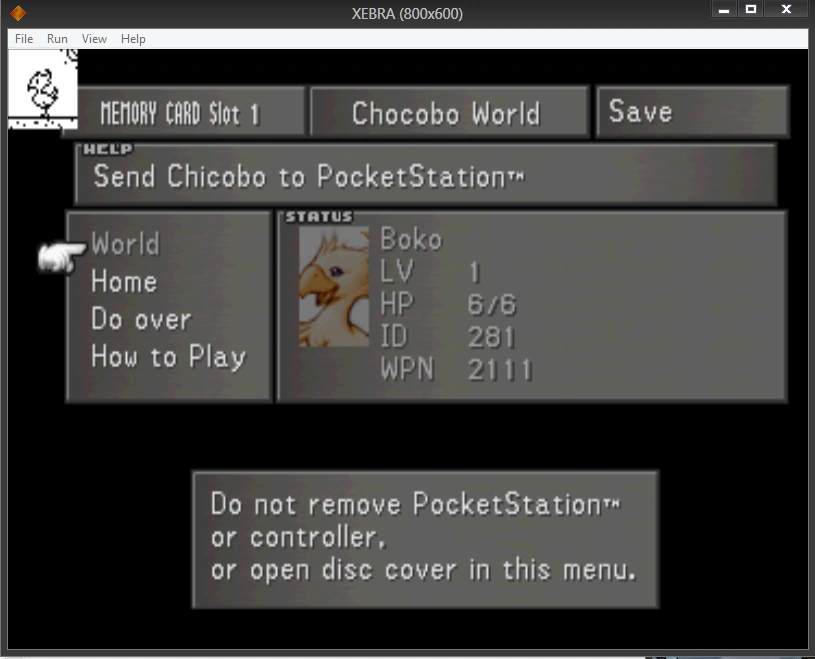
1) Download both Xebra and PK201.
2) Put everything in a folder together with respective FROM, KROM and OSROM files.
3) Run PK201 and do the initial setup, select File -> Save STAT and close it.
4) Run Xebra, select whatever game you like, then select Run -> Run-1/2/3 to start the game.
5) When in game, select Run -> Outer Card to start PocketStation emulation.
6) Enjoy your Chocobo Worlds or whatever.